Cost Plus Claims
This article provides a step-by-step guide to managing Cost Plus claims in Lentune. We’ll take you through creating a claim, associating documents, and generating the necessary documentation.
Cost Plus Claims facilitate your claims process and calculate the claimable values based on the documents associated with the claim and that have not been claimed yet.
Click here to read more about manually Managing Associations for Project Costs
Setting Up Contracts
The setup for a Cost Plus contract is similar to a fixed-price contract but with an emphasis on assigning Cost Codes to the contract lines. This ensures accurate cost allocation for claims. Refer to Set up a Head Contract as Cost Plus for details on how to set up a contract as Cost Plus.
Please also read How margin is applied.
Add a New Claim
First, from Payment claims > Head Contracts, select your Head Contract. Now on the Claims tab, click Add Claim
- In the Create receivable Claim window, enter the dates for this claim, e.g. 01/05/2024 to 31/05/2024 and click Save.
How a Document is Associated with a Cost Plus Claim
A document will be associated with a Cost Plus claim when the claim is created and if:
- The transaction date is before the end date of the claim, and:
- It is left open (i.e. it has not been associated with any previous claim).
Downloaded Documents Upon Claim Creation
Once the claim has been created, three documents will be downloaded:
- PDF Document of All Invoices: This includes the header all associated invoices at the header level. Note that an invoice that is split across multiple projects will not be included.
- Unassociated Invoices: This lists all invoices not yet associated with any claim.
- Associated Documents: This lists all documents that are associated with the current claim.
Populating the Claimable Values
When the documents have been associated and the Claim has been created, the Claimable amount column will be populated automatically and appear on the right hand side in the Edit Receivable claim screen. This is the total of the associated documents relating to the Cost Codes that have been assigned to that contract line. This is the amount recommended for you to claim for this month / date range.

If you have included a margin % in the contract lines, then this will be included in the claimable amounts. If this is a separate line that you are declaring, then you this will need to manually calculate and add in that line. No claimable values will be populated here.
When a Document is Not Automatically Associated with a Cost Plus Claim
A document will not be associated and therefore will not be included in the claimable values if:
- The transaction date is after the period end date of the claim (e.g., a Timesheet for 2nd June will not be included in a claim period of 1-30th May).
- The cost code has not been allocated to a contract line and is in the default unassigned cost code line.
- The cost code is pointing to a contract line that has been marked Hide from client.
- The invoice or subcontract has not been checked, and the time or expense has not been submitted.
- The invoice has been marked as archived.
- The document has been manually marked as Do not associate with the head contract line.
Reviewing and Adjusting Associations
You can review associated labour, non-labour, and any unassociated documents within each receivable contract line and the overall header. You can also use the downloaded documents in the Supporting document tab to review them.
If you are satisfied with the claimable values, click into the line, copy the claimable amount values into the Claimed column and click Save. This will add the values to the claim.
Alternatively, to process multiple lines, you can select the lines you want to process, then click the Actions button and select the option Populate claimed amounts from claimable amounts. This will copy the amounts for each line to the Claimed column.

Making Changes to Claims
When reviewing the claim, if you need to make amendments:
-
Make Changes from Associations
- Click into the cost you want to remove and either delete the association or mark Do not associate for this item. E.g., if there is a large subcontract claim that has come through early but you want to pass it on to your customer in the following claim, you can remove the association.
- Removing the association will remove it from this claim, leaving it open for the next claim.
- Otherwise, you can manually mark it as Do not associate which will permanently remove it from the claim that is being calculated and associated until this field is unticked again.
-
Recalculate Lines
- Once all the adjustments have been made, then remaining in the Edit Receivable claim screen, click Recalculate all amounts.
This will reflect the changes in associations.
- Adjust the Claimed value amount if it has already been populated.
3. Prepare for Final Submission
-
Remaining in the Edit Receivable claim screen, click Actions and select Generate Cost Plus supporting documents.

Then in the Associate new invoices to Claim window:
- Check the Invoice cut off date and click OK.

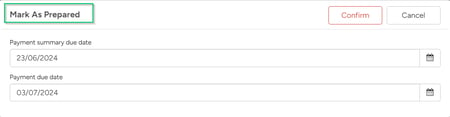
4. Mark as Prepared
- Now click Mark as Prepared.
- Check that the dates are correct and click Confirm.
This takes you to the Generate claim supporting documents window and allow you to redownload the cost plus documents. This will reflect the latest associations so that the claimed amount and the document download align. You can select to export the data to excel and / or invoice.

5. Finalizing and Sending Claims
Proceed with the claim as normal and send the following to the customer:
- Payment summary PDF.
- Cost Plus document download.
- Actual invoice of the claim.
- PDF download of the claim
Note: Subcontract and expense associations currently occur only at the header level, not the line level.
By following these steps, you can efficiently manage Cost Plus claims in Lentune, ensuring accurate cost allocation and streamlined client approval processes.
For further assistance, contact Lentune support.
Need more help? We’re here! We hope our article was helpful! If you need more info or want to connect, drop us an email at support@lentune.com.
Thank you. We love to hear from you!
Last updated: 13 June 2024