User groups allow you to collate similar Users who share the same default time settings.
Overview
Setting User groups allows you to define the default settings for several Users by collating them into a group. User groups allow you to set criteria around a certain group of Users so you can manage and report more effectively.
You can export a blank template for User Groups, or export all existing User Groups to an xlsx file, then edit and re-import it instead of manually entering User Groups. Read Import Time Sheet User Groups and Time Sheet Entry Types to learn how to do this.
Click Security Roles and Access Personas for Time Sheet Users to read about establishing access for different kinds of Time sheet Users.
Some common examples of Time Sheet User groups include:
-
- Employees paid by wage
- Employees paid by salary
- Subcontractors
- Temporary workers
- Employees based in different locations
Example: Your business employs temporary staff through a local recruitment agency. Instead of paying them through your payroll system, you will pay an invoice to the recruitment agency. Placing these crew members into a User group assists you to keep track of their time sheets and ensure that you are paying them correctly.
Click to read about Tracking Contract & Temp Staff Time Sheet data.
Create a New Time Sheet User Group
- Start at Time Sheets > User Groups. You can now view all the Time Sheet User groups that are available.
- Click New Time Sheet User Group.
-
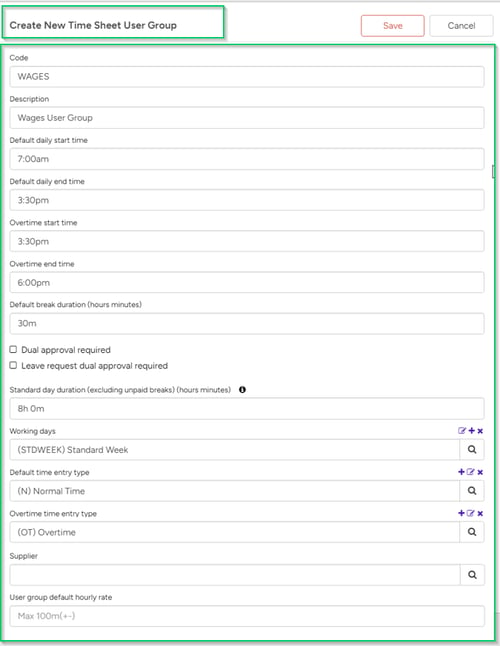
Enter a Code and Description to uniquely identify the Time Sheet User group.
- Enter the default start and end times, overtime start and end times and default break time.
- Select the Working Days, the Default time entry type and Overtime time entry type.
TIP: Set the standard day duration as the number of hours before time counts as overtime. If you leave this as empty, only the default time entry type will be applied.
-
Click Save.

This takes you back to the screen where you can assign users to the Entry Type via the Users tab.
Add Users to a User Group
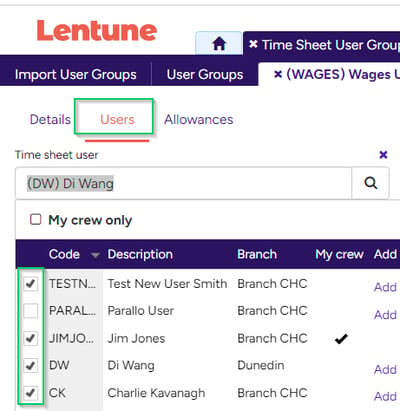
On the Users tab, click the Search icon beside the Time sheet user field, and then tick to select the users you want from the list below.

- Then click Save and close.
TIP: You can also assign a Time sheet user group to a User from the Time Sheets > Users menu, then select the User you wish to edit and click the Time sheet user tab.
Need more help? We’re here! We hope our article was helpful! If you need more info or want to connect, drop us an email at support@lentune.com.
Thank you. We love to hear from you!
Last updated: 23 May 2024
